Configuring Dial-Up Networking for Windows 95/98
Part IV -- Making Sure It All Works
 Now that your Dial-Up Networking connection is all set up, all that remains
is to make sure that you have all the required network elements to support
it. To do this, go to the Control Panel (from the quot;My Computer"
window), and double-click "Network". You should see a window like
the one below, at right.
Now that your Dial-Up Networking connection is all set up, all that remains
is to make sure that you have all the required network elements to support
it. To do this, go to the Control Panel (from the quot;My Computer"
window), and double-click "Network". You should see a window like
the one below, at right.
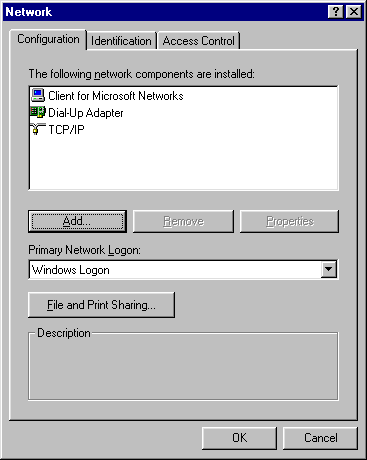 Of importance here is the box at the top of the window which shows you the
network components that are installed. In Windows 95, you will likely have
a few extras, such as IPX/SPX Compatible Protocol or NetBEUI installed.
These are unrelated to Internet connections, and can be removed safely (they
are, however, used for LAN connections; if your computer is hooked up to a
network, only remove those protocols which are bound to the Dial-Up Adapter).
The essential components are shown at right: Dial-Up Adapter and TCP/IP. The
Client for Microsoft Networks is a handy addition which allows you to save
your Internet password (Windows 98 uses Microsoft Family Logon for this
purpose). Don't worry if TCP/IP is missing: we can add it in very easily.
Of importance here is the box at the top of the window which shows you the
network components that are installed. In Windows 95, you will likely have
a few extras, such as IPX/SPX Compatible Protocol or NetBEUI installed.
These are unrelated to Internet connections, and can be removed safely (they
are, however, used for LAN connections; if your computer is hooked up to a
network, only remove those protocols which are bound to the Dial-Up Adapter).
The essential components are shown at right: Dial-Up Adapter and TCP/IP. The
Client for Microsoft Networks is a handy addition which allows you to save
your Internet password (Windows 98 uses Microsoft Family Logon for this
purpose). Don't worry if TCP/IP is missing: we can add it in very easily.
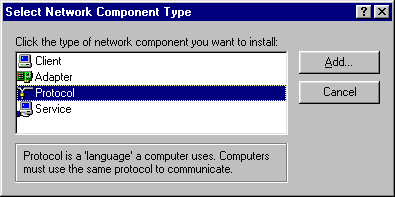
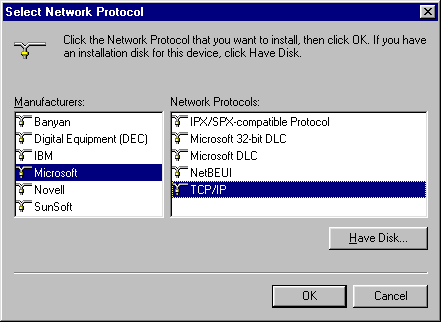
To add the TCP/IP protocol, click on the "Add" button, and then
double-click "Protocol". Select Microsoft and then TCP/IP, and
click "OK". The screens themselves are shown below. You will then
be taken back to the Network window, where you should now see TCP/IP near
the bottom of the list. Just click on "OK", let Windows restart the
computer, and you're all ready to connect.